Lennox & Addington County, Ontario
(+1) 416 918 0986
How to broadcast a microscopy session on Jitsi

How to broadcast a microscopy session on Jitsi
This article outlines how to conduct microscopy sessions using Jitsi Meet. Jitsi is an open-source web and native-app based video conferencing system very comparable to Zoom. The benefit of Jitsi is that it all users can join conferences in a modern browser without requiring an app or membership. Soil nerd currently has an open Jitsi instance available for such purposes.
Requirements
01
A microscope with a digital camera (this article is written for the Omax A35 series)
02
Updated drivers with the SDK (follow the instructions below for this)
03
A headset that works on the computer
04
A corded USB camera to allow better positioning of a camera view of you working behind your microscope
As the microscopy party, you will need a few extra things besides just Jitsi and a modern device. You will need a microscope with a working USB digital camera connected to a laptop or computer (if you have figured out how to conduct a microscopy session from your mobile phone let us know, this is useful) as well as the SDK drivers. The most common cameras on the market currently are the Omax A35 series.
The headset is to correct an issue of audio reflection in this setup, so having a headset with a separate mutable microphone is important.
Steps
- 1) Get the latest drivers for your digital camera. Go to the URL below for Omax brand. https://omaxmicroscope.com/pages/software-download
- 2) Download the regular drivers for instance: Windows Software for Cameras Beginning with A35 (Updated September 2021)
- 3) Secondly, find the SDK drivers also. This contains extra software needed to make this work. SDK for Cameras Beginning with A35 (Updated February 2017)
- 4) Ensure the camera is unplugged and then install both downloads, starting with the regular driver
- 5) Reboot your machine
- 6) Goto https://meet.soilnerd.ca:8443 in a browser
- 7) On the first lobby screen enter a title in the meeting name box and join. Remember that name.
- 8) In the next join meeting screen you will be asked to enter your name and select a camera. For a first-time user, it is important to recognize that you must give permission for this web app to use your camera and audio devices. If the permission popup doesn’t automatically happen you can do so by clicking the site permissions icon in your browser.
![]()
- 9) Ensure you have selected your headset as the microphone device ensuring permissions like above are given
![]()
- 10) Adjust your laptop so it faces the microscope and you can be clearly seen working at the microscope and the important parts of your home lab around it (test tube tray, waters, sample, etc)
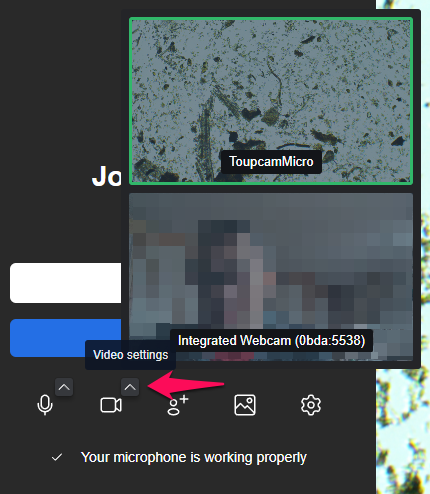
- 11) Now open a new browser tab (Cntrl+T) and repeat steps 6-8, this time selecting microscope camera by clicking the arrow up on the camera icon to change the device
![]()
- 12) Enter Microscope as the name of this conference member, mute the microphone, now click join
There is a caveat with this method that no device can be fully muted, so there will be somewhat of an echo of yourself to all parties. This is why the headset is needed. Attempting to do this with speakers will create awful feedback. If this happens, close one of the conference screens, or mute the microphone on all screens.
If you would like to also record your session, try this free software with no limits or watermarks https://www.freescreenrecording.com/